Davac4: Difference between revisions
Tags: mobile edit mobile web edit |
No edit summary |
||
| (86 intermediate revisions by 2 users not shown) | |||
| Line 1: | Line 1: | ||
=Davac 4. | =Davac 4.2 OK1ZIA= | ||
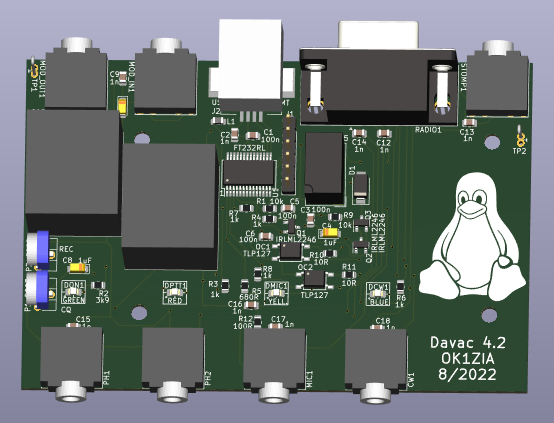
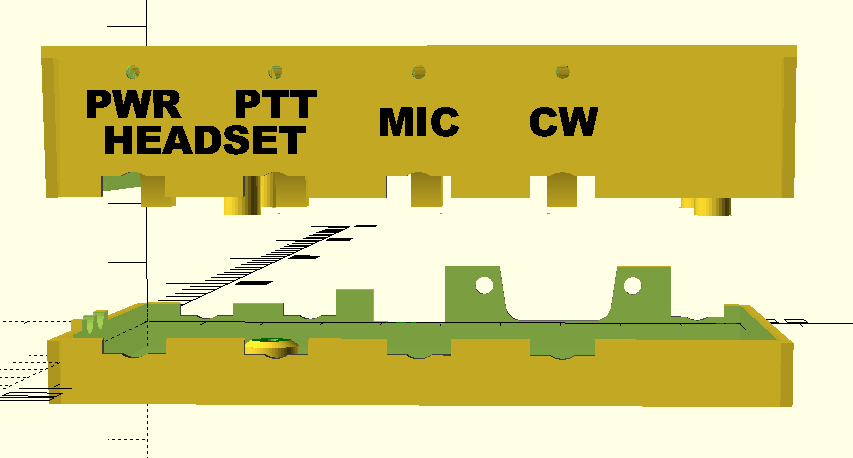
Davac 4 | Davac 4.2 is updated version of [[Davac4.1|Davac 4.1]]. It is opto-isolated interface between PC and radio. Supports CW and SSB CQ, band recording. Radio modulation comes from microphone or soundcard. | ||
Please also look at [[Davac5]]. | |||
[[ | |||
[[Image:Davac4.2-3d.png|none|frame|Davac 4.2 PCB model]] [[Image:Davac4.2-box.png|none|frame|Davac 4.2 box model]] | |||
Image: | |||
Image: | |||
= | ==Features== | ||
* Simple assembly | |||
Image: | * Most possible parts are SMD, except too expensive or unobtainable ones | ||
* Designed for SMD reflow | |||
* 3.5 jacks | |||
* 3D printed box | |||
* SMD LEDs + light guides on front panel | |||
* power supply from USB | |||
* pin header for band switching | |||
* nice logo on PCB and box :-) | |||
* radio-specific cables for different radios | |||
==Circuit diagram== | |||
[[Image:Davac4.2-schema.png|none|frame|Circuit diagram of Davac 4.2]] | |||
==PCB== | |||
{{Download|Davac42-jlcpcb.zip}} Gerber files to order PCB at [http://www.jlcpcb.com jlcpcb.com]. | |||
==Box== | |||
{{Download|davac42-box.zip}} STL files for 3D printer. | |||
Recommendations: | |||
* Nozzle 0.4mm | |||
* No support, no brim | |||
* Layer height - first 0.3mm, others 0.2mm | |||
* PETG | |||
* Slow first layer for top side (8mm/s) | |||
Print takes about 5-6 hours. | |||
Light guides are made from transparent PETG filament. | |||
==Parts== | |||
{{Download|Davac42-bom.csv}} Bill of material for [http://tme.eu tme.eu]. | |||
(not including cables) | |||
==Cable to radio== | |||
* [[Davac IC-7400 cable]] | |||
==Program the FT232R== | |||
As default, the FT232R acts as serial port. But Tucnak uses Libftdi to access it in bitbang mode. Default VID:PID must be changed to distinguish Davac from other USB serial ports. | |||
===Linux=== | |||
Use [http://rtr.ca/ft232r/ original ft232r_prog] or [http://tucnak.nagano.cz/ft232r_prog-1.25.tar.gz modified ft_prog, contains statically linked x86_64 binary]. | |||
Usage: | |||
# ft232r_prog --new-vid 0xa600 --new-pid 0xe110 --manufacturer OK1ZIA --product 'Davac 4.2' | |||
... | |||
Rewriting eeprom with new contents. | |||
Now replug the device | |||
# lsusb | |||
... | |||
Bus 002 Device 007: ID a600:e110 Asix OK1ZIA Davac 4.x | |||
# | |||
(texts are not same, they origins from lsusb database) | |||
In the case of mistake, use --old-vid and --old-pid. AFAIK this can be used also to fix fake FT232 bricked by Windows FTDI drivers. | |||
===Windows=== | |||
[[Image:Davac4.png|thumb|none|666px|MProg with loaded Davac4.ept]] | |||
Under Windows, use [http://tucnak.nagano.cz/download.php#mprog MProg]. Download [[File:Davac4.ept]] and open it in MProg. Note on Windows XP you need [https://www.ftdichip.com/Drivers/D2XX.htm D2XX drivers]; on newer versions they are installed automatically. | |||
'''Unplug all other FTDI devices''' and press the '''Program All Existing Devices''' button. | |||
==Install USB drivers== | |||
===Linux=== | |||
You have nothing to do, It will work automatically. Only on specific distributions you may have to set permissions to USB device, which is normally done by udev script. | |||
===Windows=== | |||
[[Image:Zadig.png|thumb|none|589px|Zadig with Davac4]] | |||
Under Windows 7 or newer, use [http://tucnak.nagano.cz/download.php#zadig Zadig]. On XP use 2.2. | |||
Click Options, List All Devices. | |||
Choose '''WinUSB''' and press '''Install Driver'''. | |||
Latest revision as of 11:38, 28 December 2023
Davac 4.2 OK1ZIA
Davac 4.2 is updated version of Davac 4.1. It is opto-isolated interface between PC and radio. Supports CW and SSB CQ, band recording. Radio modulation comes from microphone or soundcard.
Please also look at Davac5.
Features
- Simple assembly
- Most possible parts are SMD, except too expensive or unobtainable ones
- Designed for SMD reflow
- 3.5 jacks
- 3D printed box
- SMD LEDs + light guides on front panel
- power supply from USB
- pin header for band switching
- nice logo on PCB and box :-)
- radio-specific cables for different radios
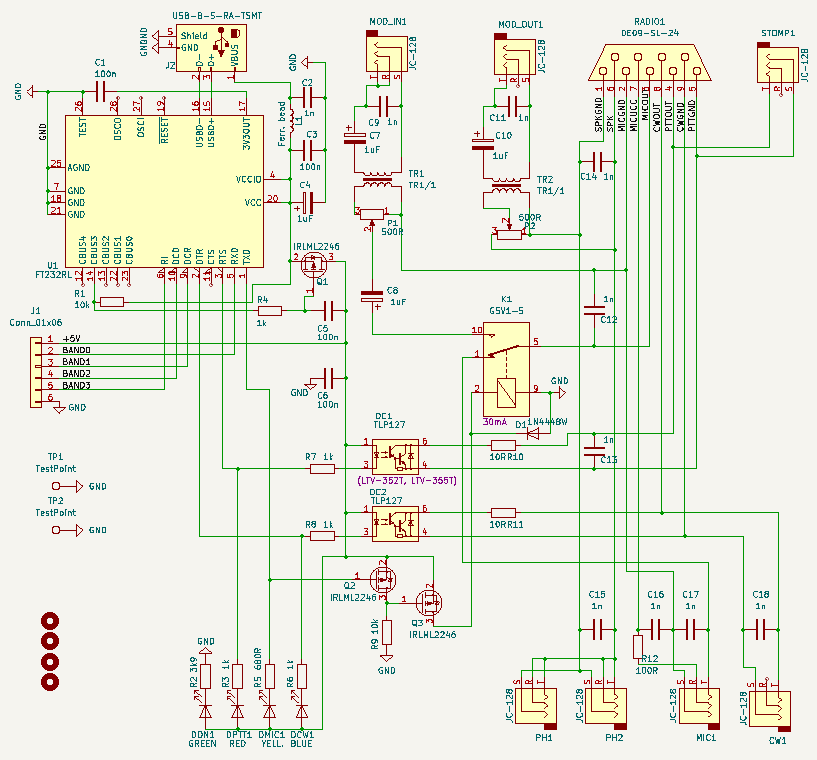
Circuit diagram
PCB
![]() Gerber files to order PCB at jlcpcb.com.
Gerber files to order PCB at jlcpcb.com.
Box
Recommendations:
- Nozzle 0.4mm
- No support, no brim
- Layer height - first 0.3mm, others 0.2mm
- PETG
- Slow first layer for top side (8mm/s)
Print takes about 5-6 hours.
Light guides are made from transparent PETG filament.
Parts
![]() Bill of material for tme.eu.
Bill of material for tme.eu.
(not including cables)
Cable to radio
Program the FT232R
As default, the FT232R acts as serial port. But Tucnak uses Libftdi to access it in bitbang mode. Default VID:PID must be changed to distinguish Davac from other USB serial ports.
Linux
Use original ft232r_prog or modified ft_prog, contains statically linked x86_64 binary.
Usage:
# ft232r_prog --new-vid 0xa600 --new-pid 0xe110 --manufacturer OK1ZIA --product 'Davac 4.2'
...
Rewriting eeprom with new contents.
Now replug the device
# lsusb
...
Bus 002 Device 007: ID a600:e110 Asix OK1ZIA Davac 4.x
#
(texts are not same, they origins from lsusb database)
In the case of mistake, use --old-vid and --old-pid. AFAIK this can be used also to fix fake FT232 bricked by Windows FTDI drivers.
Windows
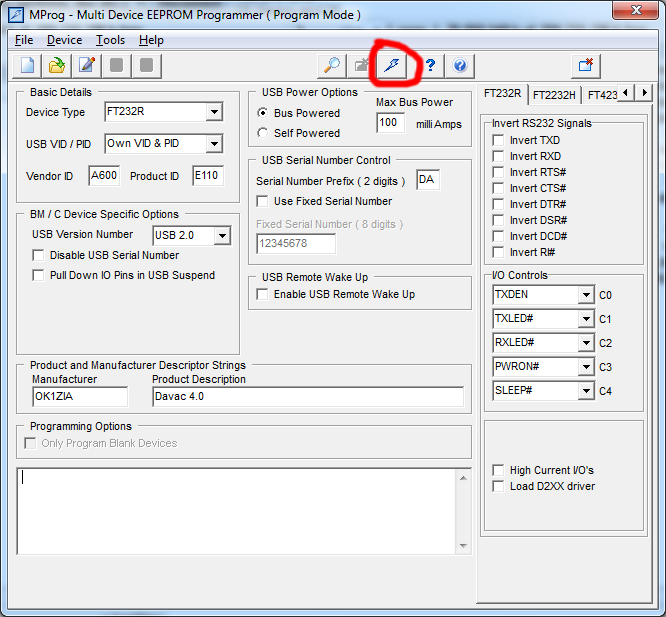
Under Windows, use MProg. Download File:Davac4.ept and open it in MProg. Note on Windows XP you need D2XX drivers; on newer versions they are installed automatically.
Unplug all other FTDI devices and press the Program All Existing Devices button.
Install USB drivers
Linux
You have nothing to do, It will work automatically. Only on specific distributions you may have to set permissions to USB device, which is normally done by udev script.
Windows
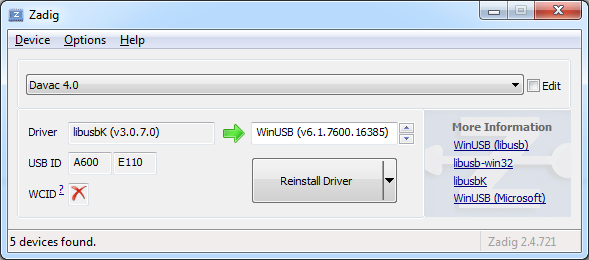
Under Windows 7 or newer, use Zadig. On XP use 2.2.
Click Options, List All Devices.
Choose WinUSB and press Install Driver.